
There are some specialist tools, which do this job very well - but they are not always the easiest to work out. More recently, I have starting using a free online resource called image-maps.com - which frankly makes the whole thing as simple as it can get.
To begin with, when building a VLE course I know that there are certain sections which students will need to have quick and direct access to. For me, these are:
- Contact details
- Reading lists
- Assessments
- Forums
- Course evaluations
- Lectures
I first need to find or create an image which fits the course itself. For example, this semester I am teaching ye olde Shakespeare course - so I have been looking for a picture related to Shakespeare. The image itself needs to be one around which, or within which, you can include the text of your sections in a way which is clearly visible. For me, I found this rather nice drawing of the Globe, with handwriting around the outside which gives it a suitable antiquated feel, while at the same time suggesting some sort of measuring or analysis of the history it is depicting:

For some reason, I could only see this image in Google preview so cannot add the attribution at this point - but normally I would include this in a caption. I will add this later once I have found it!
I now need to tailor this image to my needs. A very simple way of doing this would be to open the image in a basic image editing programme like Microsoft Paint. I can then use the Text option to add text over the image:

This is fine, but notice that my default type font (Arial) does seem rather mismatched against the handwriting elsewhere in the image. I could reduce this jarring effect by finding a font which fits better the tone of the image - a handwriting font. Fortunately, there are countless free fonts out there which could suit the purpose. Simply type 'free handwriting fonts' into Google and you will see sites like fontspace, 101fonts or dafont will doubtless show up with thousands of options which you can simply download, open and click on 'Install'. For example, typing in 'Shakespeare Font' brings up some interesting options such as this:

A lovely font - but actually, it doesn't quite fit my image on this occasion, so instead I have gone for JoeHand2, which I have downloaded (sometimes you are invited to make a small voluntary contribution of you are using the font - which is always a nice thing to do), and installed by clicking on the button:

Now I can start to add my text to the image. Using something like Microsoft Paint is easy, free and can producing surprisingly good results. If you wanted, though, to go a bit further - but didn't want to have to fork out the cash for an expensive graphics program like Photoshop, then GIMP is an excellent free alternative. GIMP works pretty much in the same way as Photoshop, but is opensource and therefore free to download for Windows, Apple or its native Linux. The additional options a programme like this brings, is some sophisticated tools for manipulating existing images and text.
For my example (and with apologies to the original artist), I have taken the liberty of using the 'clone' stamp to delete the original writing without losing the texture of the background. This will help my headers stand out more clearly. I have also used one or two of the filters - such as 'coffee stain' - not for any particular reason but because it is fun to play around with filters! The end result looks like this:

You might want to change the size of the image at this stage - the image will by default show at 100%, which is often too big for the VLE area. You can change the size of the shape in MS Paint by using the 'Resize' option. If using GIMP, you can do this a little more accurate by using 'Scale'. I generally stick to about 500px width, but if it looks the right size on the screen, then it is probably going to be fine.
Now, with my image nicely ready and saved, I can go to image-map and using the browse button upload my image:

When done, click on 'Start mapping your image', and after waiting a few seconds you will be able to 'continue' and progress to the mapping page:

An imporant thing to remember at this point is that there is no option here for backing up your progress. If you refresh the page, or put your computer to sleep, you will probably lose your progress - so if you are not sure about things to begin with then it is best to start simple. And make sure you have a stable internet connection!
Before beginning the mapping, it is worth looking at the option you have:

Once you have set your preferences, you can start to map your image. Because the headers in my example are not regularly shaped, I will be using the 'Custom Shape' option. I click the button, and then map out pathway points to outline the shape I want to make into a hotspot:

When this is done, I can paste the url (web address) of the link I want to connect with this hotspot. I will paste this over the 'http://www.image-maps.com/' text. I can give my link a title, and even use the 'Test Link' button to check that it is taking me to the right location.
Of course, for this to work you do need to have a location to send your students to. For this, you may need to go back to your VLE course page. One of the best ways to use image maps effectively is to make sure that you they are linking to is constant. If you delete it, then the image map will no longer work. Personally I find the best way of doing this is, rather than linking to uploaded files, is to create a 'Page' - which is a black document in which I can create links to uploaded files:

This illustration comes from a Moodle course, but doubtless there is a similar option in Blackboard-based VLEs. In this instance, I have created a Page called 'Reading'. I have not added the content to the page - I can do that later, since all I really need now is the link to the page itself.
If you wanted to create a link to a content area, then the button to look for is the one which means that only that content area is open. For me, this button appears in the top-left corner of each content area:

This button here is telling me that clicking on it will mean that only this topic is showing. Using the right-hand button on the mouse will bring up a context menu, from which I can copy the link which would open only this topic. In Firefox browsers this option is called 'Copy Link Location'. Chrome users will see 'Copy Link Address' and Internet Explorer users should, frankly, upgrade to a better brower - but if you insist on using the wretched thing then you will see an option called 'Copy Shortcut':

If I am linking to a Page, then I can do the same thing - use the right-hand button to copy the link address, then paste this into the box at image-maps.
Repeat this process for all the sections or headers you want, and after saving them all you should see your content areas with the selection paths showing up around them:

Now, there is one other thing we need to do before finishing. You will have saved your image somewhere - like your desktop - and uploaded that image to image-maps from there. We need to locate that image somewhere other than Image Maps (which does not store the images for you). This means you need to upload your image to your VLE course (it can be in a hidden content area) and again find the 'Link Location' or shortcut address.
If you have done this, then you can finally click on the 'Get code' button in Image Maps, and you will then be taken to a page with a number of tabs at the top. The one you want is 'html code':

This will show you the code itself. At this point we need to make a change. If you look carefully at the code, you will see in there somehwere are url link to your image - I have underlined it in the image above. You need to delete this address, and replace it with the link to the image in your VLE course page.
And that's pretty much it! Go back to your VLE page, and create or edit the area where you want the image map to appear. Make sure you switch the view to 'html'...
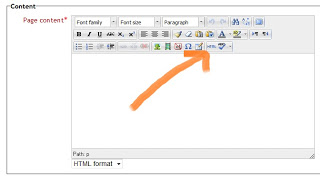
...and paste your code into it. Save and close, and that's it. You have a rather nice image map menu for your course that makes your course just that little bit distinct from more generic forms, and can possibly make the experience of using the course just a little bit more attractive:

Comments
Post a Comment